Angular2 – Sharing data between two components

Standard

angular-2-tutorialAngular2 is a fully component driven framework. Each component has its own html template where you can bind the data to this template through the respective component.

What if you need to share some data within two component? May be you need to modify the same data/variable inside multiple components.

For example,inside both navBarComponent and AppComponent, we need to change the header text of the nav bar.

First you need to write a service for storing data as angular Observebles.

import { Injectable } from '@angular/core';
import { Observable,Subject } from 'rxjs/Rx';

// lessonService to be shared within the application
@Injectable()
export class TestService {

  constructor() { }

    // Observable string sources
  private selectedTestSource = new Subject<string>();

  // Observable string streams
  selectedTestSource$ = this.selectedTestSource.asObservable();

  // Service message commands
  setSelectedTestItem(param: string) {
    this.selectedTestSource.next(param);
  }

}

Now inject this service into Component 1.


@Component({
  selector: 'app-sidenav',
  templateUrl: './sidenav.component.html',
  styleUrls: ['./sidenav.component.css']
})
export class SidenavComponent implements OnInit {

  constructor(private testService:TestService) { }

  ngOnInit() {
  }

changeTest(testId:string){
  this.testService.setSelectedTestItem(testId);
}
}

Now access this value inside the other component using a  subscriber.

import { Component, OnDestroy } from '@angular/core';
import { Subscription } from 'rxjs/Subscription';

export class AppComponent implements OnDestroy {

constructor(private testService:TestService) {
this.subscription = testService.selectedTestSource$.subscribe(
testId=&gt;{
// add your code here
});
}

ngOnDestroy() {
// prevent memory leak when component destroyed
this.subscription.unsubscribe();
}

}


Angularjs Routing – Angular1 vs Angular2

Standard

Before we start and to make sure we are in line on the terminology, I will use the name AngularJS to define AngularJS 1.x and Angular2 to define AngularJS 2.x.

AngularJS

To enable Hash (#) urls,  set the following configuration. This will shift within two nodes.(HTML5 enable mode or not)

$locationProvider.html5Mode(true);

Angular2

In Angular2 , same modes are called as PathLocationStrategy and HashLocationStrategy

PathLocationStrategy is the default strategy which is used by Angular2. This is equivalent to HTML5 mode in AngularJS.

import {ROUTER_PROVIDERS, APP_BASE_HREF} from 'angular2/router';
 
bootstrap(yourApp, [
  ROUTER_PROVIDERS, // includes binding to PathLocationStrategy
  provide(APP_BASE_HREF, {useValue: '/my/prefix/here'})
]);

HashLocationStrategy will add hash fragment to URL.

import {ROUTER_PROVIDERS, LocationStrategy, HashLocationStrategy} from 'angular2/router';  // works only for rc6 ,
// for others  import { ROUTER_PROVIDERS } from '@angular/router-deprecated';
 //  import {LocationStrategy,HashLocationStrategy }from '@angular/common';
bootstrap(yourApp, [
  ROUTER_PROVIDERS,
  provide(LocationStrategy, {useClass: HashLocationStrategy})
]);

Define Routes

AngularJS

$stateProvider.state('home', {
    url: '/',
    templateUrl: 'home.html',
    controller: 'HomeCtrl'
}).state('about', {
    url: '/about',
    templateUrl: 'about.html',
    controller: 'AboutCtrl'
})

Angular2

import {RouteConfig, Route} from 'angular2/router';
import {MyComponentHome, MyComponentAbout} from './myComponents';
@Component({
    selector: "app"
})
@RouteConfig([
    new Route({ path: '/', component: MyComponentHome, name: 'Home' }),
    new Route({ path: '/about', component: MyComponentAbout, name: 'About' })
])
export class App {...}

Template Update

AngularJS

<body>
    <ui-view>
        <i>Some content will load here!</i>
    </ui-view>
</body>

Angular2

import {RouterOutlet} from 'angular2/router';
@Component({
    selector: "app"
})
@View({
    directives: [RouterOutlet]
    template: `
      <router-outlet></router-outlet>
    `
})

Navigate through views

AngularJS

<a ui-sref="home">Home page</a>
<a ui-sref="about">About page</a>

Angular2

import {RouterLink} from 'angular2/router';
@Component({
  selector: "menu",
  directives: [RouterLink],
  template: `
     <a [routerLink]="['./Home']">Home page</a>
     <a [routerLink]="['./About']">About page</a>
  `
})
export class Menu {...}

jQuery Autocomplete example with Spring MVC

Standard

First create Spring REST controller to process the request.


@RestController
@RequestMapping(value = "/json")
public class RESTController
{

@ResponseBody
@RequestMapping(value = "/city", method = RequestMethod.GET, produces = MediaType.APPLICATION_JSON_VALUE)
public Response<List<SearchBean>> getStateList( @RequestParam("term") String term, Locale locale )
{

Response<List<SearchBean>> returnResponse = null;
List<City> cityList = null;
List<SearchBean> suggestCityList = null;
String cityName = "";
SearchBean searchBean = null;
try
{
cityList = new ArrayList<City>();
suggestCityList = new ArrayList<SearchBean>();
cityList = Data.getCityList( locale );  // load city Objects list

for ( City city : cityList )
{
cityName = city.getName();
if ( ( cityName.toLowerCase( locale ).startsWith( term.toLowerCase( locale ) )   )
{
searchBean = new SearchBean();
searchBean.setLabel( cityName );
suggestCityList.add( searchBean );
}
}
returnResponse = new Response<>( suggestCityList, "", Response.SUCCESS );
}
catch ( CustomGenericException e )
{
// TODO: handle exception

returnResponse = new Response<>( null, "", Response.ERROR );
}
return returnResponse;

}

}

SearchBean class is just a pojo class with two parameters.

now , initialize the autocomplete function.


function loadSmartkeySuggestion(element,_url,minLength,dataType){$(element).autocomplete({

source: function( request, response ) {
$.ajax({
url:_url ,
dataType: dataType,
data: {
term: request.term
},
success: function( data ) {
if(data.status == 1) // if data is available
response( data.data );
}
});
},
minLength: minLength

});}

Eclipse cannot connect to marketplace

Standard


download

If you are using windows 8, you might have come up with this issue. After hours of Googling, finally found a solution for this.

  1. Open your eclipse.ini file.
  2. Add following parameter in the bottom and save.

-Djava.net.preferIPv4Stack=true

3.Restart Eclipse.

Spring Security : Basic Http Authentication

Standard

Suppose we need to create an API which requires user authentication to access that. Spring security is there to implement this on the fly.

First create your REST service

Service.java


@RestController
@RequestMapping("/api")
public class Service
{
private static final Logger LOGGER = LoggerFactory.getLogger( Service.class );

/**
* Clear the template cache
*
* @return response object with status and message
*/
@ResponseBody
@RequestMapping(value = "/foo", method = RequestMethod.GET, produces = MediaType.APPLICATION_JSON_VALUE)
public Response<String> accessApi()
{
Response<String> returnResponse = null;
try
{

returnResponse = new Response<String>( "", "Successfull", Response.SUCCESS );
}
catch ( Exception )
{
// TODO: handle exception
returnResponse = new Response<String>( "", "Error", Response.ERROR );
LOGGER.error( ex.getMessage() );
}

return returnResponse;
}

}

Now create security config class.


@EnableWebSecurity
public class SecurityConfig extends WebSecurityConfigurerAdapter
{

@Autowired
MyBasicAuthenticationEntryPoint myBasicAuthenticationEntryPoint;

@Autowired
public void configureGlobal( AuthenticationManagerBuilder auth ) throws Exception
{
auth.inMemoryAuthentication().withUser( "user" ) // #1
.password( "password" ).roles( "USER" );
}

@Override
protected void configure( HttpSecurity http ) throws Exception
{
// @formatter:off
http
.authorizeRequests()
.antMatchers("/api/foo").hasRole("USER")
.anyRequest().permitAll()
.and()
.httpBasic()
.authenticationEntryPoint( myBasicAuthenticationEntryPoint );
// @formatter:on
}

}

Now add bean to MvcConfig class.


@Bean
public MyBasicAuthenticationEntryPoint myBasicAuthenticationEntryPoint()
{
return new MyBasicAuthenticationEntryPoint();
}

Then add SecurityConfig class to WebAppInitializer.


public class WebAppInitializer extends AbstractAnnotationConfigDispatcherServletInitializer
{
@Override
protected Class<?>[] getRootConfigClasses()
{
return new Class<?>[] {SecurityConfig.class };
}

}

Then add


public class SecurityWebApplicationInitializer extends AbstractSecurityWebApplicationInitializer
{

}

Now create entry point.


import java.io.IOException;
import java.io.PrintWriter;

import javax.servlet.ServletException;
import javax.servlet.http.HttpServletRequest;
import javax.servlet.http.HttpServletResponse;

import org.springframework.security.core.AuthenticationException;
import org.springframework.security.web.authentication.www.BasicAuthenticationEntryPoint;

public class MyBasicAuthenticationEntryPoint extends BasicAuthenticationEntryPoint
{

@Override
public void commence( final HttpServletRequest request, final HttpServletResponse response, final AuthenticationException authException ) throws IOException, ServletException
{
response.setHeader( "Access-Control-Allow-Origin", "*" );
response.setHeader( "Access-Control-Allow-Methods", "POST, GET, OPTIONS, DELETE" );
response.setHeader( "Access-Control-Max-Age", "3600" );
response.setHeader( "Access-Control-Allow-Headers", "x-requested-with" );

response.addHeader( "WWW-Authenticate", "Basic realm=\"" + getRealmName() + "\"" );
response.setStatus( HttpServletResponse.SC_UNAUTHORIZED );
final PrintWriter writer = response.getWriter();
writer.println( "HTTP Status " + HttpServletResponse.SC_UNAUTHORIZED + " - " + authException.getMessage() );
}

@Override
public void afterPropertiesSet() throws Exception
{
setRealmName( "FooService" );
super.afterPropertiesSet();
}
}

Now redirect to http:localhost/example/api/foo URL will request your credentials.

Angularjs + Spring MVC: Remove # from url

Standard

AngularJs is mainly used for developing  Single Page Applications (SPA). So different views are loaded to single html on different user actions. The typical URL of AngularJs application is as following.

Default URL : http://localhost:8080/SampleApp/

User Info : http://localhost:8080/SampleApp/#/User

What if you need to remove hash from url and make it SEO friendly.

You need to change both client side and server side configurations for this.

Client side.

Add following to app.js where you have defined the routing.


$locationProvider.html5Mode(true);

Now set base folder in your index.html

 <base href="/SampleApp/index.html"></base> 

Now add the Server side configuration. Its just adding URL mapping and changing the routing.

 @RequestMapping(value = { "/User" }, method = RequestMethod.GET)
public ModelAndView redirectPage(ModelAndView modelAndView ) throws ServletException, IOException
{
RedirectView view = new RedirectView( "redirect:" + "/" );
view.setExposeModelAttributes( false );
return new ModelAndView( view );
}


Speeding up AngularJS apps with simple optimizations

Standard

pic_angular

AngularJS is a huge framework with that already has many performance enhancements built in, but they can’t solve all our problems. No matter how fast the framework, we can all create sluggish code through bad practices and not understanding key concepts that help it perform well. The following performance pointers are some of the things I’ve learned from developing Angular applications that will hopefully enable you to keep building fast applications.

The key concept behind these performance considerations is reducing the number of$$watchers inside Angular to improve the $digest cycle’s performance, something you’ll see and hear more of as you continue working with Angular. These are crucial to keeping our application state fast and responsive for the user. Each time a Model is updated, either through user input in the View, or via service input to the Controller, Angular runs something called a$digest cycle.

This cycle is an internal execution loop that runs through your entire application’s bindings and checks if any values have changed. If values have changed, Angular will also update any values in the Model to return to a clear internal state. When we create data-bindings with AngularJS, we’re creating more $$watchers and $scope Objects, which in turn will take longer to process on each $digest. As we scale our applications, we need to be mindful of how many scopes and bindings we create, as these all add up quickly – each one being checked per $digest loop.

Let’s walk through some quick and easy performance considerations for Angular alongside some code examples that help us reduce $$watcher footprint and understand the $digest cycle a bit better.

One-time binding syntax {{ ::value }}

AngularJS dropped a really interesting feature recently in the beta version of 1.3.0: the ability to render data once and let it persist without being affected by future Model updates. This is fantastic news for developers highly concerned with performance! Before this update, we’d typically render a value in the DOM like so:

  1. <h1>{{ title }}</h1>

With the new one-time binding syntax, we introduce a double-colon before our value:

  1. <h1>{{ ::title }}</h1>

Angular processes the DOM as usual and once the value has been resolved it removes the particular property from it’s internal $$watchers list. What does this mean for performance? A lot! This is a fantastic addition to helping us fine tune our applications.

It’s known that Angular becomes slower with around 2,000 bindings due to the process behind dirty-checking. The less we can add to this limit the better, as bindings can add up without us really noticing it!

Using the single binding syntax is easy and most importantly fast. The syntax is clear and concise, and a real benefit to lowering the $$watcher overhead. The less work Angular has to do, the more responsive our applications will become.

$scope.$apply() versus $scope.$digest()

At some stage in your Angular career, you’ll have stumbled across the $scope.$apply()method. It’s often misused in a hopeful, “$scope.$apply will solve my coding between plugins, I’m just going to leave it here” type scenario, which isn’t the best way to use an API. For this reason, it’s misunderstood, but it shouldn’t be as it’s actually quite simple.

$scope.$apply is designed for telling Angular that a Model change has occurred outside of its lifecycle. That’s it. We just call $scope.$apply to let Angular update itself with those new values. It’s particularly important to remember when to use it correctly, as it’s confused me in the past and thrown uncaught errors in my JavaScript. You’ll get an error thrown from Angular if you’re calling $scope.$apply in the “wrong” place, usually too high up the call stack.

We all use third party plugins, and often the ones we use have their own event system and make DOM updates without Angular knowing. That’s exactly where the $scope.$apply method comes in to help. After these updates occur, calling $scope.$apply kicks off the $digest loop again and Angular pulls in values that were updated outside of its core.

Here’s some pseudo code example usage to demonstrate the concept:

  1. $(elem).myPlugin({
  2.   onchange: function (newValue) {
  3.     // model changes outside of Angular
  4.     $(this).val(newValue);
  5.     // tell Angular values have changed and to update via $digest
  6.     $scope.$apply();
  7.   }
  8. });

When $scope.$apply() is called, it kicks the entire application into the $digest loop and in turn runs $rootScope.$digest(). This is what actually kicks off the internal $digest cycle. This cycle processes all of the watchers of the $scope it was called from (and its children) until no more listeners can be fired. In simple terms, it traverses all scopes and bindings of your application seeing if things have changed. At first, this process is pretty rapid, but certainly slows over time as the application scales.

Instead of $scope.$apply, we could turn to $scope.$digest, which runs the exact same$digest loop, but is executed from the current $scope downwards through its children, a much less costly venture.

The only caveat to this approach is that if you’re dependent on two-way binding between Objects from the parent $scope, the parent $scope won’t be updated until the next $rootScope full$digest cycle. This is because the $scope.$digest only descends rather than covering our entire $scope tree. If you want to update parent $scope values, then unfortunately we can’t use this performance tip and may as well invoke the $scope.$apply to run the full loop.

Avoid ng-repeat where possible

Onto one of the more challenging approaches: avoiding ng-repeat where we can and where it makes sense. We’ve so far learned that the internals of Angular are pretty intelligent, but we can optimize where we can to help keep it performing well. We’ve learned so far that bindings create a bigger $digest cycle, and it’d be a great idea for directives we create to potentially be statically rendered components that aren’t tied into Angular unless really needed.

The ng-repeat directive is most likely the worst offender for performance concerns, which means it can easily be abused. An ng-repeat likely deals with Arrays of $scope Objects and this hammers the $digest cycle’s performance.

For example, instead of rendering a global navigation using ng-repeat, we could create our own navigation using the $interpolate provider to render our template against an Object and convert it into DOM nodes.

Be mindful of how many bindings and scopes you’re creating inside templates that become a repeater. Do some quick math and avoid any potential bottlenecks. I often think a little harder about how I can reduce the amount of bindings and scopes before digging into actually writing the code.

More DOM manipulation in Directives

Another offender that will increase $$watcher counts are the core Angular directives such asng-show and ng-hide. Although these might not immediately increase watcher counts dramatically, they can easily stack up in the hundreds inside an ng-repeat.

An ng-repeat leads to an increasing amount of $$watchers which may only serve a tiny purpose but are constantly looped over by Angular – things such as true and false toggling to activate ng-show and ng-hide. We can aim to remove these where it might make sense to.

If you’re doing something like this, it’s time to reconsider:

  1. <div ng-show=”something”></div>
  2. $scope.something = false;
  3. $scope.someMethod = function () {
  4.   $scope.something = true;
  5. };

If you’re building a Directive and some of the logic doesn’t need to rely on a Model, don’t use Angular for it. This logic will live inside the link callback; under no circumstance write DOM manipulation logic in a Controller! There are plenty of Directives floating around that set a$scope value to “true” and back to “false” to show and hide content, when a built-in .hide()and .show() call would be best suited. Angular also provides us with Directives such as ng-mouseenter, these can be more costly too as they’re not only binding an event listener, they become a part of the $digest cycle adding to the application weight. Inside the link callback, we should advocate the use of addEventListener or jQuery’s “on” method.

  1. var menu = $element.find(‘ul’);
  2. menu.hide();
  3. $scope.someMethod = function () {
  4.   menu.show();
  5. };

This gives us better separation with things we actually require from Angular and things we don’t. In the example above, we likely aren’t reliant on Model changes to show a menu as the menu is part of our Directive and can be toggled like normal DOM. Saving $$watchers saves us any performance bottlenecks later on!

Limit DOM filters

Filters are really simple to use, we insert a pipe, the filter name and we’re done. However, Angular runs every single filter twice per $digest cycle once something has changed. This is some pretty heavy lifting. The first run is from the $$watchers detecting any changes, the second run is to see if there are further changes that need updated values.

Here’s an example of a DOM filter, these are the slowest type of filter, preprocessing our data would be much faster. If you can, avoid the inline filter syntax.

  1. {{ filter_expression | filter : expression : comparator }}

Angular includes a $filter provider, which you can use to run filters in your JavaScript before parsing into the DOM. This will preprocess our data before sending it to the View, which avoids the step of parsing the DOM and understanding the inline filter syntax.

  1. $filter('filter')(array, expression, comparator);

Summing up

These Angular performance tips have helped me develop applications better, with more structure and more thinking behind the code before I get stuck in. It’s not premature optimization when the Angular team provides us with great new APIs to help our apps perform better: they listen, they build, they release. It’s up to us to keep pushing Angular’s reputation forward by building lightning-fast and responsive applications.

A few key points to take away:

  • Before diving into code, consider how to best architect your application to avoid performance challenges that dirty-checking faces in large quantities of Objects.
  • Be mindful of ng-repeats — how much data are you expecting back? How much weight is that going to add to Angular’s $digest cycle?
  • Not everything needs to be “Angular.” In Directives there are many cases we need to work with pure DOM.
  • Keep checking out the Angular project on GitHub, as there are often some great hidden features that can be found from upcoming releases. That’s how I came across the “bind once” functionality.
  • The more $$watchers there are, the slower your application will be, and with some of the performance enhancements above, even their simplicity can make a huge difference

Spring Core Basics – Part 1

Standard

spring-2

First go to command line and create a simple project with maven.

mvn archetype:generate -DgroupId=com.supun.common -DartifactId=SpringExamples 
-DarchetypeArtifactId=maven-archetype-quickstart -DinteractiveMode=false

This post has the setting up instruction of maven. Now edit the pom.xml file as follows.


<project xmlns="http://maven.apache.org/POM/4.0.0" xmlns:xsi="http://www.w3.org/2001/XMLSchema-instance"
 xsi:schemaLocation="http://maven.apache.org/POM/4.0.0 http://maven.apache.org/xsd/maven-4.0.0.xsd">
 <modelVersion>4.0.0</modelVersion>

<groupId>com.supun.common</groupId>
 <artifactId>SpringExamples</artifactId>
 <version>1.0-SNAPSHOT</version>
 <packaging>jar</packaging>

<name>SpringExamples</name>
 <url>http://maven.apache.org</url>

<properties>
 <project.build.sourceEncoding>UTF-8</project.build.sourceEncoding>
 </properties>

<dependencies>
 <dependency>
 <groupId>junit</groupId>
 <artifactId>junit</artifactId>
 <version>3.8.1</version>
 <scope>test</scope>
 </dependency>
 <dependency>
 <groupId>org.springframework</groupId>
 <artifactId>spring-core</artifactId>
 <version>4.0.5.RELEASE</version>
 </dependency>
 <dependency>
 <groupId>org.springframework</groupId>
 <artifactId>spring-beans</artifactId>
 <version>4.0.5.RELEASE</version>
 </dependency>
 <dependency>
 <groupId>org.springframework</groupId>
 <artifactId>spring-context</artifactId>
 <version>4.0.5.RELEASE</version>
 </dependency>
 </dependencies>
</project>


Now import this project to your Eclipse workspace. It will automatically download the dependencies.

Then create a Beans.xml file inside the src/main/java folder as follows.


<?xml version="1.0" encoding="UTF-8"?>

<beans xmlns="http://www.springframework.org/schema/beans"
 xmlns:xsi="http://www.w3.org/2001/XMLSchema-instance"
 xsi:schemaLocation="http://www.springframework.org/schema/beans
 http://www.springframework.org/schema/beans/spring-beans-3.0.xsd">

<bean id="helloWorld" class="com.supun.common.HelloWorld" >
 <property name="message" value="Hello Spring"/>
 </bean>
</beans>

Now create HelloWorld.java class.


package com.supun.common;

public class HelloWorld {

private String message;

public void getMessage(){
 System.out.println("Your Message : " + message);
 }


public void setMessage(String message) {
 this.message = message;
 }
}


Now change the App.java class as follows.


package com.supun.common;

import org.springframework.context.ApplicationContext;
import org.springframework.context.support.ClassPathXmlApplicationContext;

public class App {
 public static void main(String[] args) {
 ApplicationContext context = 
 new ClassPathXmlApplicationContext("Beans.xml");

HelloWorld obj = (HelloWorld) context.getBean("helloWorld");

obj.getMessage();
 }
}

Now run the App.java class. The output is : Your Message : Hello Spring

In this example the spring configuration are added from the xml file.

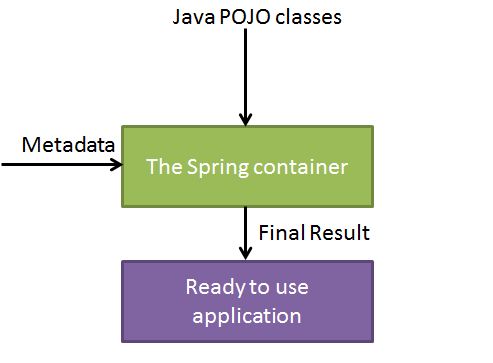
This is how the spring framework is working.

spring_ioc_container

The Spring container is at the core of the Spring Framework. The container will create the objects, wire them together, configure them, and manage their complete lifecycle from creation till destruction. The Spring container uses dependency injection (DI) to manage the components that make up an application.These objects are called Spring Beans

In above example, the HelloWorld.java class is a POJO class. The metadata is taken from the Beans.xml.This metadata can be stored in the java file too.

Spring Bean Definition 

The objects that form the backbone of your application and that are managed by the Spring IoC      container are called beans. A bean is an object that is instantiated, assembled, and otherwise managed by a Spring IoC container. These beans are created with the configuration metadata that you supply to the container, for example, in the form of XML <bean/> definitions which you have already seen.

The bean definition contains the information called configuration metadata which is needed for the container to know the followings:

  • How to create a bean
  • Bean’s lifecycle details
  • Bean’s dependencies

All the above configuration metadata translates into a set of the following properties that make up each bean definition.

Properties Description
class This attribute is mandatory and specify the bean class to be used to create the bean.
name This attribute specifies the bean identifier uniquely. In XML-based configuration metadata, you use the id and/or name attributes to specify the bean identifier(s).
scope This attribute specifies the scope of the objects created from a particular bean definition and it will be discussed in bean scopes chapter.
constructor-arg
properties
autowiring mode
lazy-initialization mode A lazy-initialized bean tells the IoC container to create a bean instance when it is first requested, rather than at startup.
initialization method A callback to be called just after all necessary properties on the bean have been set by the container. It will be discussed in bean life cycle chapter.
destruction method A callback to be used when the container containing the bean is destroyed. It will be discussed in bean life cycle chapter.

Spring IoC container is totally decoupled from the format in which this configuration metadata is actually written. There are following three important methods to provide configuration metadata to the Spring Container:

  1. XML based configuration file.

<?xml version="1.0" encoding="UTF-8"?>

<beans xmlns="http://www.springframework.org/schema/beans"
xmlns:xsi="http://www.w3.org/2001/XMLSchema-instance"
xsi:schemaLocation="http://www.springframework.org/schema/beans
http://www.springframework.org/schema/beans/spring-beans-3.0.xsd">

<!-- A simple bean definition -->
<bean id="..." class="...">
<!-- collaborators and configuration for this bean go here -->
</bean>

<!-- A bean definition with lazy init set on -->
<bean id="..." class="..." lazy-init="true">
<!-- collaborators and configuration for this bean go here -->
</bean>

<!-- A bean definition with initialization method -->
<bean id="..." class="..." init-method="...">
<!-- collaborators and configuration for this bean go here -->
</bean>

<!-- A bean definition with destruction method -->
<bean id="..." class="..." destroy-method="...">
<!-- collaborators and configuration for this bean go here -->
</bean>

<!-- more bean definitions go here -->

</beans>

2.Annotation-based configuration.

Starting from Spring 2.5 it became possible to configure the dependency injection using annotations. So instead of using XML to describe a bean wiring, you can move the bean configuration into the component class itself by using annotations on the relevant class, method, or field declaration.

3.Java Based configuration.

Annotating a class with the @Configuration indicates that the class can be used by the Spring IoC container as a source of bean definitions. The @Bean annotation tells Spring that a method annotated with @Bean will return an object that should be registered as a bean in the Spring application context. The simplest possible @Configuration class would be as follows:


Creating RESTfull API using node.js , express + mongoDB

Standard

restful-api-node-express-4-router


Here is a quick guide showing how to build a RESTful API using Node.js, Express, and MongoDB.

We will build a RESTful API for a library.  I will approach the problem by building an API for books only, and then scaling it to include all the other library items.

First Rollout: Build a Dumb Server

Before we start writing code, we need to fetch the dependencies. Even though the only dependency is Express, I like to keep a package.json file in case I ever decide to add other dependencies in the future. So, the first thing we will do is create a file called package.json and put the following code in it:

{
 name: library-rest-api,
 version:0.0.1,
 description:A simple library REST api,
 dependencies: {
 express:~3.1.0
 }
}

Now open up your terminal or command line and go to the project’s directory. Type “npm install” to install Express. It will be installed in the node_modules directory.Now that we have all the dependencies ready, let’s create a simple server that will capture requests and respond with a Hello World.

// Module dependencies.
var application_root = __dirname,
 express = require( 'express' ); //Web framework

//Create server
var app = express();

// Configure server
app.configure( function() {
 //parses request body and populates request.body
 app.use( express.bodyParser() );

 //checks request.body for HTTP method overrides
 app.use( express.methodOverride() );

 //perform route lookup based on url and HTTP method
 app.use( app.router );

 //Show all errors in development
 app.use( express.errorHandler({ dumpExceptions: true, showStack: true }));
});

//Router
//Get a list of all books
app.get( '/api/books', function( request, response ) {
 var books = [
 {
 title: "Book 1",
 author: "Author 1",
 releaseDate: "01/01/2014"
 },
 {
 title: "Book 2",
 author: "Author 2",
 releaseDate: "02/02/2014"
 }
 ];

 response.send(books);
});
//Insert a new book
app.post( '/api/books', function( request, response ) {
 var book = {
 title: request.body.title,
 author: request.body.author,
 releaseDate: request.body.releaseDate
 };

 response.send(book);
});
//Get a single book by id
app.get( '/api/books/:id', function( request, response ) {
 var book = {
 title: "Unique Book",
 author: "Unique Author",
 releaseDate: "03/03/2014"
 };

 response.send(book);
});
//Update a book
app.put( '/api/books/:id', function( request, response ) {
 response.send("Updated!");
});
//Delete a book
app.delete( '/api/books/:id', function( request, response ) {
 response.send("Deleted");
});

//Start server
var port = 4711;
app.listen( port, function() {
 console.log( 'Express server listening on port %d in %s mode', port, app.settings.env );
});

Save the file and run

node server.js

to start the server. The server should response with the hardcoded data when you try to get a book and should echo back the data when you try to do another operation, such as inserting, deleting, or updating.

Setting up the Database

Before you start using real data in your API, you need to install MongoDB or use a third-party service like MongoHQ. Please refer to the instructions on the MongoDB website to install MongoDB.

After you install MongoDB, create a database called library_database. Then, add a collection named “books” to the database. Run the database server (mongod), and you should be all set.

Second Rollout: Use Real Data

As always, before we start writing any code, we must have all the dependencies ready. The new dependency that we will introduce for this rollout is Mongoose. To install Mongoose, modify your package.json file to look as follows:


{
 "name": "library-rest-api",
 "version": "0.0.1",
 "description": "A simple library REST api",
 "dependencies": {
 "express": "~3.1.0",
 "mongoose": "~3.5.5"
 }
}

and run

npm install

To use Mongoose from our Node.js application, we first need to require it. Change the module dependencies code block to


// Module dependencies.
var application_root = __dirname,
express = require( 'express' ), //Web framework
path = require( 'path' ), //Utilities for dealing with file paths
mongoose = require( 'mongoose' ); //Used for accessing a MongoDB database

Then, we need to connect Mongoose to our database. We use the connect method to connect it to our local (or remote) database. Note that the url points to the database inside MongoDB (in this case it is library_database).

//Connect to database
mongoose.connect( 'mongodb://localhost/library_database' );

Mongoose provides two neat classes for dealing with data: Schema and model. Schema is used for data validation, and Model is used to send and receive data from the database. We will now create a Schema and a Model that adhere to our original data model.

//Schema
var BookSchema = new mongoose.Schema({
    title: String,
    author: String,
    releaseDate: Date
});
//Model
var BookModel = mongoose.model( 'Book', BookSchema );

Now we have everything ready to start responding to API requests. Since all of the request/response processing happens in the router, we will only change the router code it account for the persistent data. The new router should look as follows:


//Router
//Get a list of all books
app.get( '/api/books', function( request, response ) {
return BookModel.find(function( err, books ) {
if( !err ) {
return response.send( books );
} else {
console.log( err );
return response.send('ERROR');
}
});
});
//Insert a new book
app.post( '/api/books', function( request, response ) {
var book = new BookModel({
title: request.body.title,
author: request.body.author,
releaseDate: request.body.releaseDate
});
console.log(request.body.title);
book.save( function( err ) {
if( !err ) {
console.log( 'created' );
return response.send( book );
} else {
console.log( err );
return response.send('ERROR');
}
});
});
//Get a single book by id
app.get( '/api/books/:id', function( request, response ) {
return BookModel.findById( request.params.id, function( err, book ) {
if( !err ) {
return response.send( book );
} else {
console.log( err );
return response.send('ERROR');
}
});
});
//Update a book
app.put( '/api/books/:id', function( request, response ) {
return BookModel.findById( request.params.id, function( err, book ) {
book.title = request.body.title;
book.author = request.body.author;
book.releaseDate = request.body.releaseDate;

return book.save( function( err ) {
if( !err ) {
console.log( 'book updated' );
return response.send( book );
} else {
console.log( err );
return response.send('ERROR');
}
});
});
});
//Delete a book
app.delete( '/api/books/:id', function( request, response ) {
BookModel.findById( request.params.id, function( err, book ) {
return book.remove( function( err ) {
if( !err ) {
console.log( 'Book removed' );
return response.send( '' );
} else {
console.log( err );
return response.send('ERROR');
}
});
});
});

insert-books

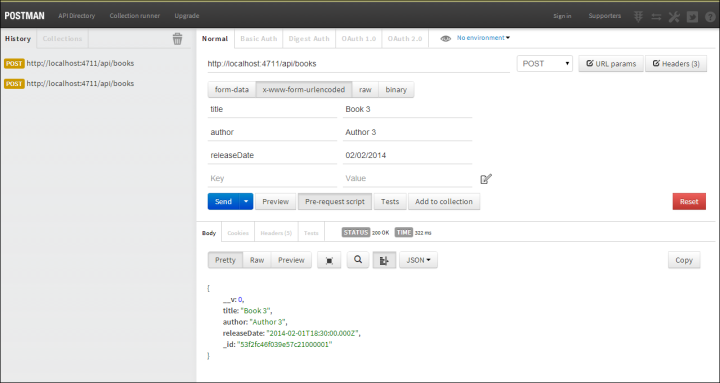
Here we go, our REST API is now ready to roll.Happy coding 🙂

PS. This is how make it jsonp enable.

Add the ” app.set(“jsonp callback”, true);” to configuration. Now set response as jsonp as follows.

return response.jsonp( books );